OctoPrint on a Galaxy S6
**UPDATED 5/10/2020**
Why?
I was quite happy with the performance and print quality I was able to get out of my 3D printer, a Monoprice Select Mini. With my print settings dialed in, I was ready to move on to getting my 3D printer to run a bit more independently. This led me to find OctoPrint, a convenient remote control and monitoring software that can run on various platforms.
Ideally, OctoPrint would be installed on a Linux-based single board computer like a Raspberry Pi. Unfortunately, I had no Pi, but I did have a possible alternative: a Samsung Galaxy S6.

☑ Can run compatible OS (Debian)
☑ USB input (via USB OTG)
☑ 2.4GHz & 5GHz WiFi
☑ Internal 32GB storage
After a weekend of reading countless wikis, blogs, XDA threads, and Reddit posts, I finally got it all working. My S6 was running OctoPrint and controlling my 3D printer as it printed various items, with barely any problems.
Getting this to work involved using information from numerous sources, and a lot of trial and error with different applications and settings.

Originally, I did this project with a Galaxy S3 and it was functioning fine, but I ran into a power problem. I couldn’t find a USB OTG cable that would allow me to keep the S3 charged while connected to a 3D printer.
I had the same problem with a Galaxy S6, but since I already had a wireless charger for it, I decided to switch to the S6.
I wrote this guide to try and consolidate all the information it takes to turn a stock S6 into a functional 3D printer server.
How
*WARNING: Rooting your phone exposes system files and increase the chances of accidentally deleting them, bricking your device. Differences in firmware/program versions may cause unexpected errors during installation/use. You should have a general understanding of what you’re doing and proceed with caution.*
1 – If you rooted your S6 before, it’s recommended to start fresh by flashing the stock firmware to minimize any conflicts with past root configurations.
⦿ How to restore S6 to stock (YouTube) or text version
⦿ S6 firmware (all variants)*
⦿ Latest Odin software
*Note: I tried this with versions G920PVPS4DQK1 (Nov8, 2017) and G920PVPS4DRC2 (Mar21, 2018), which are both android 7.0.
2 – Root the phone by following the guide linked here. As of writing this post I used TWRP 3.3.1-0 and Magisk v20.4 with APK v7.1.1.
3 – Make sure you’re connected to a WiFi or mobile network and open Google Play, install Linux Deploy (2.6.0), and then BusyBox (1.31.1). Open BusyBox and tap “INSTALL”, then “OK” on the pop up to confirm, and finally approve the “Superuser Request” for BusyBox.
4 – Open Linux Deploy. Notice there are multiple menu buttons for settings in the app. I’ve named each one below for the purpose of this guide.
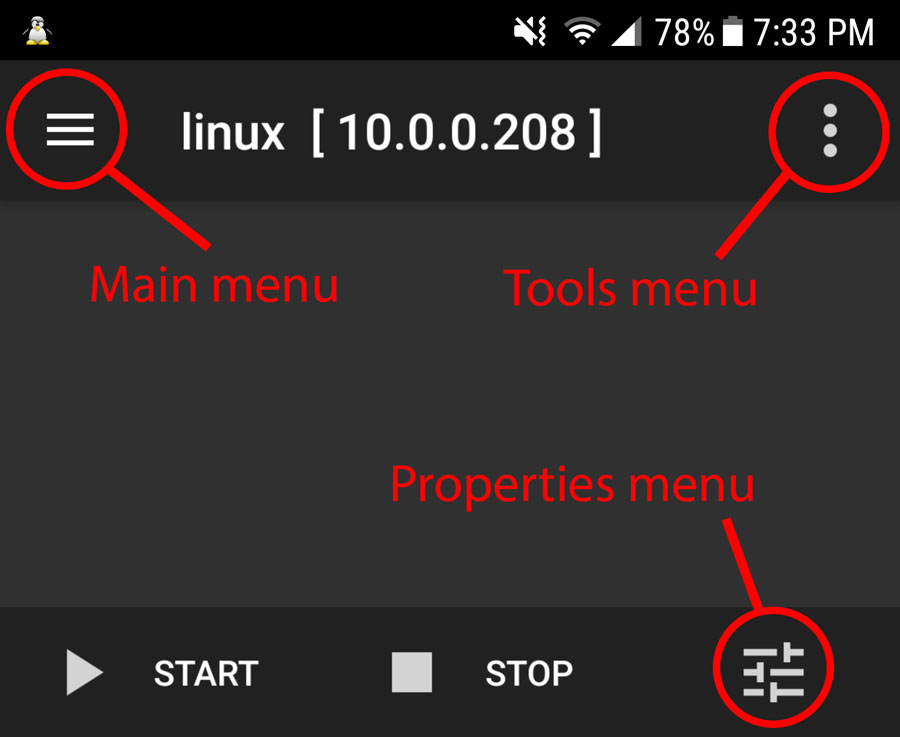
-Upper left button = Main menu
-Upper right button = Tools menu
-Lower right button = Properties menu
5 – Go to Main menu > Settings, and check the boxes for Lock screen, Lock Wi-Fi, and Wake lock. Scroll down to “Environment”, tap “PATH variable” and enter directory where BusyBox was installed: /system/xbin
Tap “Remove ENV” and then “Update ENV”. Restart the device.
6 – Open Linux Deploy again and go to the Properties Menu. Change the settings below:
BOOTSTRAP:
⦿ Distribution: Debian
⦿ Architecture: arm64
⦿ Distribution suite: stretch or buster
⦿ Install type: File
⦿ Install path: ${EXTERNAL_STORAGE}/debian.img
~Note: ${EXTERNAL_STORAGE} = /sdcard
⦿ Image size (MB): 4000
~Note: 1.2GB is needed for system files, so set 2GB minimum so you have space for files in OctoPrint. Sometimes, creating an image larger than 4096 MB will cause errors on install, or with the image during runtime. You can always expand the image later using a few shell commands below. I was able to install with a size of 6144 MB (ymmv).
⦿ File system: ext4
⦿ User name: AUsername
⦿ User password: Strong_Password
⦿ Localisation: en_US.UTF-8
~This is for English (US). You can change the language by using this table of language codes to find the correct language code to select.
INIT:
⦿ Enable: Enabled
⦿ System: sysv
⦿ Settings Async: Disabled
MOUNTS:
⦿ Enable: Enabled
⦿ Mount points: Source /sdcard Target: /sdcard
SSH:
⦿ Enable: Enabled
7 – Go back to the Linux Deploy home screen, tap Tools menu > Install, and approve the “Superuser Request” for Linux Deploy. This will take about 10 minutes to install, and will end with “<<< deploy” as the last line in the output on the screen. Restart the phone.
8 – Open Google Play and install the SSH client ConnectBot (1.9.6). Tap the “+” button to add a host. The following settings will create a connection to the local shell in the Android system:
⦿ Protocol: local
⦿ Nickname: Local host (or whatever you like)
Tap “+” in the upper right to save the new host.
9 – Open the host that was just created. To access some necessary files and commands, switch to root user in the Android system with the following command:
su root10 – Before accessing the Debian system, check the image for any errors and fix them automatically:
e2fsck -f -y /path/to/your/linux.imgNote: If there’s a random problem with the Debian system (like SSH not running after reboot), the system may not have shut down properly causing image corruption. Running the above command usually fixes these related errors.
11 – To open a root shell inside the Debian system, run the following command:
/data/data/ru.meefik.linuxdeploy/files/bin/linuxdeploy shell12 – The root password needs to be set up for the first time by typing “passwd” and following the on screen instructions to set the new root password.
13 – This first line adds the standard Debian user to a group with permissions to access the internal storage (/sdcard). The second line sets Bash as the default shell for the standard user and starts it on log in.
usermod -a -G aid_everybody AUsername
chsh -s /bin/bash AUsername
14 – Run the following to exit and stop the Debian system.
exit
/data/data/ru.meefik.linuxdeploy/files/bin/linuxdeploy stop -u
Restart the phone.
15 – Now that the root account has a password, you have a few options to log in as root in Linux Deploy:
– through the local shell as shown in Step 11 (note: with this method when done with the shell, it must be shut down using command in Step 14 to prevent image corruption)
– SSH on ConnectBot*:
Create a new host and use the following settings:
⦿ Protocol: ssh
⦿ username@hostname:port: root@localhost
⦿ Nickname: any nickname
When logging in, enter root password set previously in.
– SSH from computer*:
Using an SSH client from a computer gives the advantage of working with a bigger screen/keyboard. Use the IP address at the top of Linux Deploy, and the port number that was set in the Properties menu (default is 22) in Step 6. Log in with username “root” and the password set previously.


*Note: Due to restrictions from device firmware documented here: Linux Deploy Issue #224 GitHub, you may not have these options available to access the root account. With Linux Deploy 2.6.0, I found these options working for my G920P, but had to repeat everything from Step 9. Sometimes reinstalling the image from Step 6 works too; Linux Deploy is interesting like that.
16 – Open Linux Deploy and tap “▶ START” to start the system.
Using an option from the last step, connect to the root account of the Debian system to update the package lists and system. If prompted, tap the “y” key then “enter” key to approve of additional space the upgrade will use.
apt update
apt upgrade
17 – Now to install some basic programs OctoPrint will require. Tap the “y” key then “enter” key to approve the additional space the installs will use. (Source for OctoPrint install: Basic setup)
apt install python2.7
apt install python-pip python-dev python-setuptools python-virtualenv git wget libyaml-dev build-essential
18 – When the install finishes, type exit and tap the enter key. Return to Linux Deploy and tap “◼ STOP” then “OK” to stop the Debian system. Restart the phone. Reopen Linux Deploy and tap “▶ START”.
19 – Now we can work from the standard user account instead of the root account. Using Step 13 as a guide, create a new SSH connection for the standard user created in Step 6, substituting the username and password where appropriate.
20 – Using your SSH client of choice, log in to the standard user account. You’ll be in your home directory. The commands below will make a virtual environment called venv in the current directory, activate it, and then upgrade pip if necessary before installing the latest OctoPrint. The virtual environment is turned off with deactivate.
virtualenv venv
source venv/bin/activate
pip install pip --upgrade
pip install https://get.octoprint.org/latest
deactivate
21 – Now, we can finally start OctoPrint by running the command below.
~/venv/bin/octoprint daemon start22 – To access OctoPrint, open a web browser and type in the device IP and default port 5000 separated by a colon like this: DeviceIP:5000
Go through the “Setup Wizard” and be sure to set a secure username and password under “Access Control”. Leave “Server Commands” blank as none of the standard commands work (for now).
23 – Now, just use a USB On-The-Go cable to connect your 3D printer to your S6. Take note of any extra options that show up under “Serial Port” after you click the refresh button. That is most likely your 3D printer, select it, but don’t click “Connect” just yet.

24 – For the OctoPrint system to be able to communicate with the 3D printer, we need to change the permissions for where it’s mounted. (This will have to be done each time you reconnect the 3D printer to the S6)
Open ConnectBot and open the local shell for the Android environment.
Run su root and then the command below that matches the “Serial Port” selected in OctoPrint.
chmod 666 /dev/ttyACM0

chmod 666 /dev/ttyUSB0
25 – After setting your serial port and baud rate, click “Connect” in OctoPrint and you’re ready to start printing! You can view the active communication with your printer under the “Terminal” tab.
Use one of the following commands through the standard Debian user to restart and stop the OctoPrint server:
~/venv/bin/octoprint daemon restart

~/venv/bin/octoprint daemon stop
~If your printer doesn’t connect, try changing the “Baudrate” (115200 usually works), or change the “Serial Port” and its corresponding permissions.
Some Malyan/Monoprice printers have a known issue connecting with OctoPrint, but there’s a plugin with a fix with more info as well.
Add Autostart
To further automate our new OctoPrint server, we’ll enable it to start automatically when Debian starts in Linux Deploy. In addition, Linux Deploy can also start on Android boot up.
1 – Make sure the OctoPrint server isn’t running.
~/venv/bin/octoprint daemon stop2 – Open a root shell into the Debian system.
3 – The following commands will download 2 scripts (octoprint.init and octoprint.default) into the current directory, then moves and renames them into their appropriate directories.
These 2 files tell the init system how to run OctoPrint at boot.
wget https://github.com/foosel/OctoPrint/raw/master/scripts/octoprint.init && mv octoprint.init /etc/init.d/octoprint
wget https://github.com/foosel/OctoPrint/raw/master/scripts/octoprint.default && mv octoprint.default /etc/default/octoprint
4 – To get these files to work on the system, a few lines will need to be edited. Using the built in text editor vi, open the first file from the last step.
vi /etc/init.d/octoprintOctoPrint doesn’t have write access to the default PID file location, so the line for PIDFILE needs to be edited so it looks like the one below:
PIDFILE=/home/YOURUSERNAMEHERE/.octoprint/$PKGNAME.pid5 – Use vi to edit the second downloaded file:
vi /etc/default/octoprintChange the following lines according to your paths and username:
OCTOPRINT_USER=your_username

BASEDIR=/home/your_username/.octoprint

CONFIGFILE=/home/your_username/.octoprint/config.yaml

DAEMON=/home/your_username/venv/bin/octoprint
Save and close the second file.
6 – Set the appropriate permissions for the files, and update the init system to use the added files so OctoPrint will run on Debian start up:
chmod 755 /etc/init.d/octoprint
chmod 644 /etc/default/octoprint
update-rc.d octoprint defaults
7 – Exit your shell, press “◼ STOP” in Linux Deploy, and restart the phone.
8 – The final part of the automation process is to get Debian to start after Android boots up. Open Linux Deploy -> Main menu -> Settings. Enable Autostart, and set Autostart delay to 5*. Now restart the phone and watch OctoPrint become available in your browser as your phone boots up.
*Note: You may need to increase your Autostart delay to 10 if SSH isn’t working right, or OctoPrint failed, or something else. This is experimental after all.
9 – OctoPrint can now restart itself through the web interface button. Open Settings, look under Server. Enter the command below for the Restart OctoPrint field:
/etc/init.d/octoprint restartEnjoy your new OctoPrint server! 😀
Useful shell commands
Here are some useful shell commands that you may use repeatedly when working with the Android and Debian systems.
⦿ Check and repair linux system image
e2fsck -f /path/to/your/linux.img⦿ Increase size of Linux system image by PICK_SIZE in megabytes (Source)
dd if=/dev/zero bs=1048576 count=PICK_SIZE >> /path/to/your/linux.img
e2fsck -f /path/to/your/linux.img
resize2fs /path/to/your/linux.img
⦿ Shortcut to access Linux Deploy with “linuxdeploy CMDS_HERE” instead of full path
mount -o rw,remount /system
ln -s /data/data/ru.meefik.linuxdeploy/files/bin/linuxdeploy /system/xbin/linuxdeploy
mount -o ro,remount /system
⦿ Open root shell into Linux Deploy system
/data/data/ru.meefik.linuxdeploy/files/bin/linuxdeploy shell⦿ Start/Stop Linux distro w/services from shell
/data/data/ru.meefik.linuxdeploy/files/bin/linuxdeploy start -m

/data/data/ru.meefik.linuxdeploy/files/bin/linuxdeploy stop -u
⦿ Remount /system (or other directory) as “rw” (read/write) or “ro” (read only)
mount -o rw,remount /system

mount -o ro,remount /system
This is truly amazing! Oh I remember trying to achieve this very same feat with the Debian Kit version multiple times, but always to no avail. The way you figured out how to use the USB without compiling a custom kernel was absolutely genius. I too am trying your steps on my S6 (stock 7.0 rooted) and I can get as far “apt” installing. However, attempting to “virtualenv venv” from ConnectBot SSH gives an error on Stretch. I can get a little further on Buster, but upon “pip install pip –upgrade”, there seems to be a network (proxy?) problem and the packages won’t load. I was wondering if you would recommend using a certain apk of BusyBox, or perhaps a different Android version or XDA rom. It would be dope if there was a way to set up something similar that didn’t require root, but this is still a huge victory. I’m really hoping to get this working as I am eager to see how it can perform on all of my other rooted Android devices. Thank you so much and I hope you decide to keep going strong with your projects!
Thank you, glad you enjoyed it. I started the exact same way with Debian Kit, lol.
What error did you get when trying “virtualenv venv”? For me, it was usually either a package from Step 17 not getting installed for some reason, not restarting properly after installing packages, or random image corruption, which can be fixed with e2fsck.
The pip problem could be as simple as deleting the virtual environment folder and recreating it, or it could be the same problem as described for virtualenv; you just made it further this time.
I’ve updated the post with version numbers for better reference of what I was using for more repeatable results.
Hope this helps 😀
Hello Somekev,
I’ve also installed octoprint on Galaxy s3 and soldered a usb otg cable that is capable of charging (just connect sense and ground pins with a 60k resistor). I’m trying to write it on my blog also, hopefully i can finish it in a day or two.) The details about Linux-Deploy part on your blog is great by the way.
https://ercintorun.blogspot.com/2020/05/draft-installing-octoprint-on-samsung.html
Thank you. I’ll have to keep in mind that info about the OTG cable.
Nice write up in your post about compiling an S3 kernel with CH341 driver 👍
Hi, I tried several times, but my phone don’t recognize the printer. I managed to connect to octoprint server even without Linux deploy, just using termux on other phone and without virtual env. I couldn’t understand what was the step that gave Linux deploy USB access as stated by the other poster. I followed every step by the letter several times but since my kernel doesn’t have the printer diver activated octoprint fails to connect to it. By the way what’s the point to use a virtual env to run octoprint? Thanks.
Linux deploy doesn’t automatically grant USB access to the linux system, so the permissions to read/write need to be set up for the device.
First, Step 23 explains one way to identify the location where your printer shows up, which can be something like /dev/ttyACM* or /dev/ttyACM* (* usually 0, but can be other number).
Then, Step 24 actually sets the permission for the printer identified in the last step so that the linux system (and OctoPrint) can read/write to the printer.
But if your phone doesn’t have the driver that will talk to your printer (which usually leads to nothing extra showing up in OctoPrint’s serial port dropdown), then that’s kind of the end of the road until you flash a custom kernel with that driver onto your phone. What phone and printer are you using?
As for virtualenv…
But really, it’s a recommended way from OctoPrint’s homepage, and my (limited) understanding of it is it keeps OctoPrint and its dependencies together, separate from your linux environment, helping prevent OctoPrint from breaking if a dependency is upgraded or changed.
Hope this explains it a bit better.
I really really really really wanna made it with my Xiaomi MI A1 phone. My unique problem is that I use my MI A1 as webcam and if I install octoprint in there, can I use it as webcam too? Like /dev/video or something like this?
I’ve already installed octoprint on Galaxy s4 (android 5 with chroot to debian using linux deploy.
I can’t connect to my 3d printer Ender 3. In chrooted env I don’t have /dev/ttyACM* device. Octoprint tryied to /dev/ttyUSB0. I’ve got error
Unexpected error while connecting to serial port /dev/ttyUSB0, baudrate 115200 from hook default: error: ‘(22, ‘Invalid argument’)’ @ comm.py:_open_serial:2784
I can’t see any devices in lsusb, only lsusb -t (on android I can see devices in lsusb)
android@localhost:/opt/OctoPrint$ lsusb -t
/: Bus 02.Port 1: Dev 1, Class=root_hub, Driver=msm_hsusb_host/1p, 480M
|__ Port 1: Dev 2, If 0, Class=, Driver=, 12M
/: Bus 01.Port 1: Dev 1, Class=root_hub, Driver=msm_hsic_host/1p, 480M
|__ Port 1: Dev 2, If 0, Class=, Driver=diag_bridge, 480M
|__ Port 1: Dev 2, If 1, Class=, Driver=hsic_sysmon, 480M
|__ Port 1: Dev 2, If 2, Class=, Driver=ks_bridge, 480M
|__ Port 1: Dev 2, If 3, Class=, Driver=mdm_bridge, 480M
|__ Port 1: Dev 2, If 4, Class=, Driver=qc_csvt, 480M
|__ Port 1: Dev 2, If 5, Class=, Driver=mdm_bridge, 480M
|__ Port 1: Dev 2, If 6, Class=, Driver=rmnet_usb, 480M
|__ Port 1: Dev 2, If 7, Class=, Driver=rmnet_usb, 480M
|__ Port 1: Dev 2, If 8, Class=, Driver=rmnet_usb, 480M
How can I map usb device to chroot environment? I’ve tried chmod on /dev/ttyUSB0
Similar problem is described here https://github.com/meefik/linuxdeploy/issues/1006